
Studs & Pearls has been around for quite some time. This blog turns 4 years old on July 15, 2014 – less than a week from today! S&P hasn’t always been the way it is now; there was a lot of growing, exploring and trial and error along the way. Even after all this time, I’m still constantly learning and tweaking the way I present my projects on this website. Between my experience as a published DIY fashion author and blogger, I’ve learned quite a bit about writing tutorials. The author part especially taught me a lot.
Here are some of my biggest tips for writing an awesome DIY tutorial, as I’m aware that many of my readers are DIY bloggers as well – be sure to ask me if you have any questions!
1) Use the Shortest Amount of Steps
2) Include Alternative Measurements
3) Provide Resources
4) Include Warnings or Precautions
5) Emphasize Special Aspects
6) Take a Break and Re-Read
5) Emphasize Special Aspects
6) Take a Break and Re-Read
1) Use the Shortest Amount of Steps
Right before I started writing the book, I was given a hefty pamphlet covering the processes involved. I remember printing the pages out, and obsessively highlighting the specifics that I typically wouldn’t have thought of beforehand. Needless to say, I highlighted a lot. One concept that heavily transferred over into my blog writing was the idea of using the shortest amount of steps possible. The notion of this wasn’t simply to try and stuff everything onto one page…but instead to focus on what is only absolutely necessary, and to eliminate any extras. This will help highlight the most vital steps to make the project happen.
For example, let’s say one step requires the reader to create a 1-inch fold along the raw edge of fabric. The next step requires the reader to pin in place. Instead of creating two separate steps with two separate photos, these actions can easily be combined. The photo can show a folded edge, pinned in place – and the text can read something like “Create a 1 inch fold along the raw edge. Pin in place.” The photo and statement condenses two steps into one, with both actions still visually represented. That second statement represents the action just as great as a second photo would.
Condensing wouldn’t read as well if you stated something like, “Cut a zig zag border along the raw edge. Fold up and pin in place.” …You can’t see the first part represented in the photo, so in a case like this it would be more beneficial to separate the two.
Here’s one last visual (real life) example. While writing a project for eHow Style, I had photographed two separate steps. The first required a short strand of thread to be tied around another bunch of thread that would soon become a tassel. The second required the excess thread from the shorter strand to be cut off. While I initially photographed these two steps separately, I realized that I could simply include the second photo and tell the reader to tie the thread around the bunch and trim the excess.
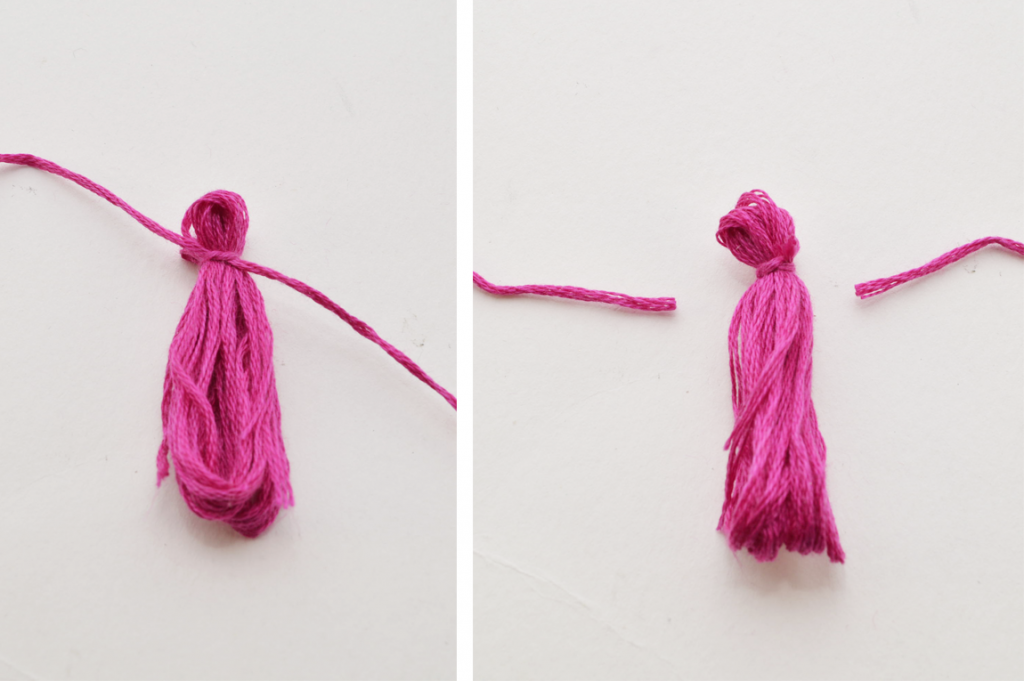
So, instead of including both of these photos, I just included the second one. It still got the point across, while making the same impact in a little less space.
2) Include Alternative Measurements
For the first few years of Studs & Pearls, I listed my measurements in inches and feet. When I started to write the book, I was required to list every inch measurement followed by the centimeter equivalent in parentheses. This would provide an easy conversion for readers in other parts of the world.
I realized that simply providing the centimeter equivalent would eliminate the extra step for the reader, which in turn, would make them more likely to carry on with the project. Ever since then, I’ve adopted that concept for the blog’s projects. It will help your out-of-country readers take on your tutorial with ease!
3) Provide Resources
3) Provide Resources
DIY veterans are more likely to know the basic techniques of crafting. However, you never know the skill level of your reader, and some readers might be completely new to DIY. If a tutorial requires the reader to create a whip stitch, find a whip stitch tutorial on the web and link it in your post. You can say something like, “Click here for a whip stitch diagram!” – The project should stay on track and not turn into a whip stitch lesson. Better yet, you can even write up your own whip stitch tutorial and use it as a reference for all future projects. Otherwise, Google is your friend!
Other basics that might need to be referred to include properly opening and closing jump rings, creating a wire loop, etc. Providing useful resources for techniques used in your tutorial will give the reader all the knowledge they need for taking the project on, making the process much more welcoming and easy.
4) Include Warnings or Precautions
Is your project messy? Does it take a couple hours, but is totally worth the time? Be sure to state this in the beginning. If it’s a messy one (hello, glitter!)…encourage the reader to head outside. Safety precautions are especially important to signify in the beginning; I feel very strongly about such warnings.
If you’re using super strong E6000 glue, head outside or use in a VERY well-ventilated area. Turn on the fans if you must, and don’t eat or drink anything while using it. If you’re using spray paint, take it outdoors and protect your work surface. Pay attention to warnings and labels on packaging, especially with supplies that are flammable or temperature sensitive. If you’re using an iron, inserting the word “carefully” into a step is a kind reminder for your reader to be cautious.
5) Emphasize Special Aspects
Highlight your tutorial’s awesome traits from the very beginning (or title, if you can!). Is it no-sew, or a beginner friendly project? Is it inspired by designer xyz, and only cost you xyz dollars to make? Is it inspired by something unconventional, such as food (like this cake decorating technique applied to a bag) or the architecture from an old building?
Drawing attention to these special aspects will not only attract readers, but accentuate what exactly it is about your project that stands out. From personal experience, I’ve noticed that no-sew’s and beginner DIY’s are especially popular, because everyone of all skill levels can take it on. If this is the case for your tutorial – say so! Don’t forget to mention said aspect when sharing on social media, too.
6) Take a Break and Re-Read
Once you’ve typed everything up and prepped the photos, take a breather and come back to proofread. Personally, taking breaks enables me to spot spelling errors and mis-numbered steps with ease. When you’re moving things around and editing for a long time, it can be easy to overlook errors.
This will also give you a chance to ensure that the steps flow into one another. Ultimately, you want everything to make sense. Re-read it two, three or four times before hitting that “Post” button, so you can be sure that your visitors read your best work yet.
Have any more questions? Leave a comment or shoot me an email at kirsten [at] wildamor.com!
xx K