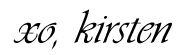

Up until recently, I was never much of a hat person. Actually – I was never a hat person, period. But for whatever reason, I’ve started to wear beanies as the temperature starts to drop. I already own a few (back when I used to try and be a hat person!) but decided to give a DIY beanie a shot. So happy I did, because I’m loving this one! The finished product that you see here is actually my third try with the same sweater. But that’s how you learn new things, right?

While it took me three times to finally perfect a beanie making method, I spent barely $2 on the sweater. You can easily make several beanies from one sweater, or even several different accessories like I did in this DIY from a year ago (Sweater Arm Warmers, Leg Warmers, Headband and Circle Scarf). Keep reading for instructions! —

Supplies:– Thrifted/old sweater (choose one with a little stretch to it!)
You’ll also need:
You’ll also need:
– Sewing machine, preferably with a denim needle to accommodate the thick fabric
(you can also hand sew this!)
– Sewing needle and coordinating thread
– Ruler
– Scissors
– Sewing pins
– Fray Check (optional)

1) Cut a rectangle from the sweater, measuring about 12 inches (30.48 cm) wide and 17 inches (43.18 cm) long. This takes into account a beanie that is folded up about 1 inch (2.53 cm) at the bottom. You can decrease or increase the measurements, if needed. Along those lines, you can always not fold up the bottom of your beanie, or fold up a greater amount than I did (so many possibilities!)Depending on the type of sweater you are using, you can use the finished bottom edge for the bottom edge of your beanie. Some sweaters have a stretchy bottom, while others don’t.

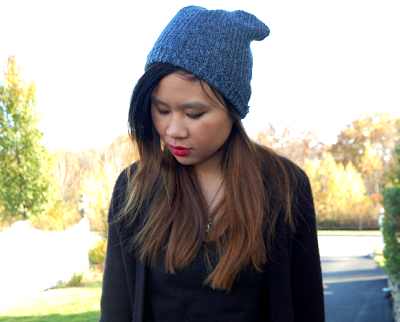
2) Fold the sweater rectangle in half, lengthwise. Make sure the “front” sides are facing each other (unless of course, the stitching is the same on both sides of your sweater). Pin along the edge.
3) Sew along this edge.

4) Adjust the tension/settings on your sewing machine so that you can sew the largest, loosest stitch possible. Also change your settings to a straight stitch (Setting “A” in my case).

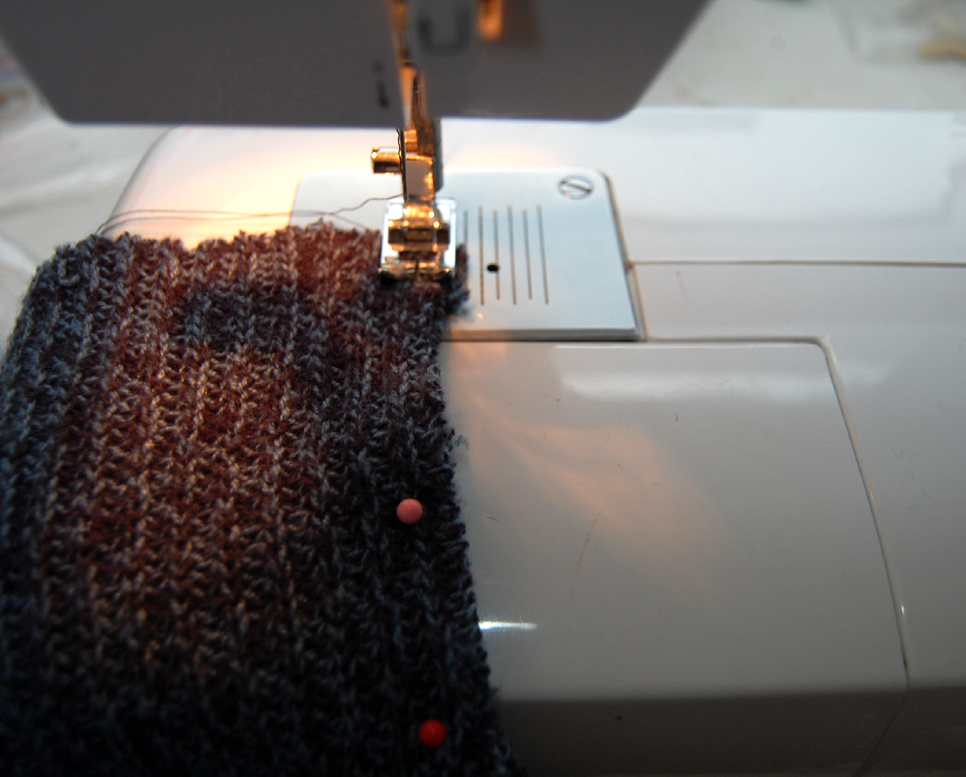
5) Sew a straight stitch all around the top of the sweater “tube”, about .5 inch (1.27 cm) from the top edge. Remember that you aren’t sewing the 2 layers together – just a straight stitch all around, on a single layer. Technically, you’re not sewing anything to anything. This stitch will be used to gather the fabric at the top.

Tip: When you are sewing around the top and come back to the point where you started, make sure the stitch doesn’t actually meet at the ends. This will make it easier to pull and gather the thread at the next step. If you look closely in the photo above, you can see the black thread along the top.

6) Carefully pull the thread and gather the material together. With some adjusting and pulling, the fabric will eventually bunch. Tie and cut off the thread.

7) Adjust the settings on your sewing machine back to normal/the settings you were using before. Sew a straight stitch directly under the bunched up fabric.

8) Tie off the thread, and cut the excess.
9) Turn the beanie right side out. The top of the beanie will have a bunched effect (which you can see 2 pictures down). If you decide to fold up the bottom of the beanie, you can hand sew a few stitches to keep the fold in place.

10) Optional: Add some Fray Check along the raw edges to prevent fraying. Some sweaters will fray more or less than others. Aside from when I was cutting, this sweater material actually doesn’t fray at all.


I’m loving the marled blue of this sweater/beanie, and it’s easily become my new favorite autumn accessory. I’m hoping to make a few more from different types of sweaters…definitely going to keep an eye out for good sweaters to use! I’m also planning on going through my fabric stash/closet to see if I have anything else that can be made into a beanie. Hoping to make a striped or printed one!