
I am SO excited to share this project, because it’s inspired by something out of the ordinary (at least, in the world of fashion).
A couple months ago, I saw a photo of cookies decorated with gorgeous icing flowers. They looked delicate, and had vintage chic vibe to them. After doing a little research, I learned that these textured flowers were a type of brush embroidery. This is a smudging technique used to decorate cakes and cookies, involving a square tip brush. The end result is a soft look similar to lace. A specific type of icing called royal icing is used in brush embroidery, which dries to a hard, matte finish – perfect for holding an intricate design.
I found a brush embroidery video in which a cookie is decorated – you can check out the video here. I based this project off of the techniques used in the video.

Brush embroidery made my strange mind think of fabric paint bottles. I think it had to do with crafting during my childhood; when I was in elementary school, I used to love taking fabric paint bottles – with the pointed tips – and drawing designs on wax paper and other non-porous surfaces. When that dried, the design could be peeled off and used in various ways. I often stuck them to my bedroom window as makeshift window clings, or on plastic craft boxes and notebooks.

Trying out this project has been in the back of my mind for a while, but I was waiting until I found the perfect bag to attempt it on. During a recent Target run, I spotted a lavendar purse – on sale for $7.48! There was a tiny stain on it, but for barely $8, I wasn’t going to complain (I’m also SO ready for spring, so I was more than happy to see a pastel shade).
I know most of you reading this are probably thinking, “I could NEVER do this!!!!”…I promise it is so, so simple. Your lines don’t have to be straight, and your hand doesn’t even have to be steady. Promise.

This is also a prime example of why I include “food” in my DIY fashion inspirations. See how I made it, below.


Supplies:
– Purse with flat surface
– Small bottle of fabric paint in a contrasting color. Should have a pointed tip, & may be labeled as “3D” or “writer”
(I purchased mine at Michael’s for less than $2)
– Soft bristled square tip brush
(I actually used an extra eye liner brush that I had on hand, but normal paint brushes work just as fine)
– Pencil
– Scrap paper or cardboard (not shown)

1) Before painting on the bag, I’d recommend practicing on scrap paper. As I mentioned earlier, it may look complicated, but I PROMISE it isn’t.
It might help to draw a rough outline of a 5 petal flower with the pencil. The petals don’t have to be perfect or even at all.

2) Outline a petal with paint, making the line wavy. The style of the petals makes it easy to cover up little mistakes.
Tip: Before each and EVERY time you squeeze the paint bottle, do so on scrap paper to get the paint flowing – then continue on your intended surface. If you’re familiar with these bottles, the pressure can sometimes push the paint out forcefully. This will result in a big glob of paint, which you don’t really want! This tends to happen when there’s a lot of air in the bottle. If you’re lucky, you can just wipe away the paint on some surfaces, but it’s better to be safe than sorry.

3) Using the brush, drag the paint away from the edge, in short strokes. The idea is to “feather” the paint inwards, leaving more paint at the edge and less paint in the petal’s center.
Another tip: The scrap paper was super useful; I found that it helped to wipe excess paint off of the brush while feathering.

4) The same method was repeated with the remaining petals. Remember, this doesn’t have to completely perfect! Just go for it.

5) Repeat again for the second smaller set of petals. Add a few dots to the center, or a small swirled shape if you’d like.

6) Once you’ve practiced, lightly sketch flower outlines on the bag. I drew one flower right on that stain. The outlines will give you a general guideline as to where you’ll be painting.
If your bag is a dark color, try using a white charcoal pencil or chalk pencil.

7) Paint the flowers. I’d recommend starting in one corner and working your way down/across the bag (unlike what I did!). This will decrease the chances of your hand accidentally sliding into wet paint.

Again, it might help to wipe off excess paint off your brush every now and then.


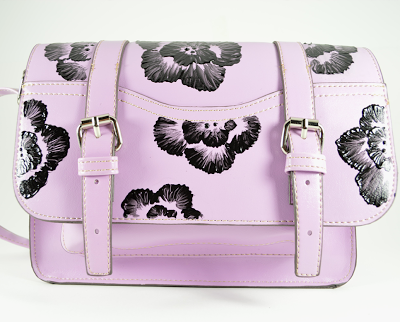
…Stain? What stain?

8) Repeat until the entire bag is covered. You can make as little or as many as you’d like.


9) Let dry completely. I let mine dry overnight.


I might replace the strap with some chain, as I tend to like longer straps on my purses. Either way – I’m happy with the project. Probably one of my favorites to date.
xx K