
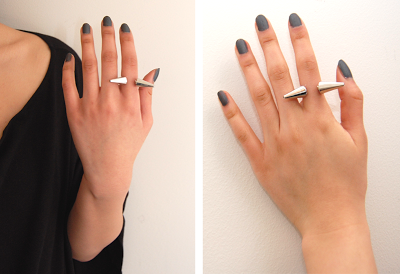

By now, I think it’s pretty obvious I have a soft spot for statement jewelry. This ring creates the illusion of a spike going through your finger, although the ring is SO lightweight you probably won’t even feel it.
EDIT: Everyone keeps asking where I got the spikes. They’re NOT spikes! Technically, at least. They’re cone bead caps, as I indicated below. Bead caps are way easier to find, unlike spikes, which is why I used them. You can find some on Etsy here – you’ll have to browse through them if you want to find caps without the fancy filigree.

Supplies:
– Jewelry pliers
– Super//E6000 glue
– Adjustable ring blank
– 2 cone bead caps

1) If your ring blank has a loop on it, twist it off with the pliers. Separate the two ends of the ring to widen up it up a bit.


Easy 🙂
Side note: Has anyone ever tried matte nailpolish? It’s my favorite! Matte nailpolish has that edgy vibe, but it’s still girly – considering nailpolish itself is pretty girly. But the matte finish is fairly offbeat, which I love.
My original plan was to post a jeans DIY, but the pictures of me wearing the finished product are on a friend’s camera. We went to a show in Manhattan and I wore the jeans, but I didn’t bring my bulky Nikon…so when I get those from her, I’ll be sure to post the project!
Also, be sure to send in any questions for the Q&A I’m having! Leave them in a comment, e-mail me at kirsten.studsandpearls@gmail.com or tweet me at @kirstengail. Be sure to include your name and location.
xo,
kirsten