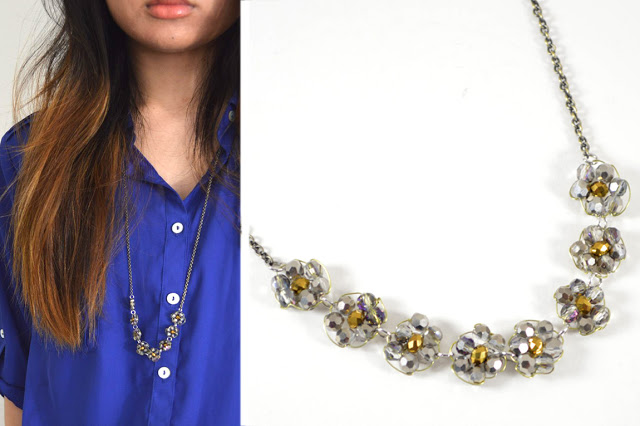

This week’s inspiration is all about beads…lots of them! Yesterday, I shared some inspirational photos involving intricate beaded pieces. Of course, the projects here at s&p will be much more practical in terms of tutorials, but I couldn’t help but fall in love with the gorgeous beaded accessories. Today, I’m starting off the bead theme with a beaded daisy chain necklace.
As I mentioned in the previous post, I always used to make pony bead key chains when I was younger. The technique and pattern use for the daisy chain is adapted from the pony bead flowers I often made during those days. It looks complicated, but I promise it really isn’t! You might even be surprised at how easy they are to make. Check out the tutorial, below! —
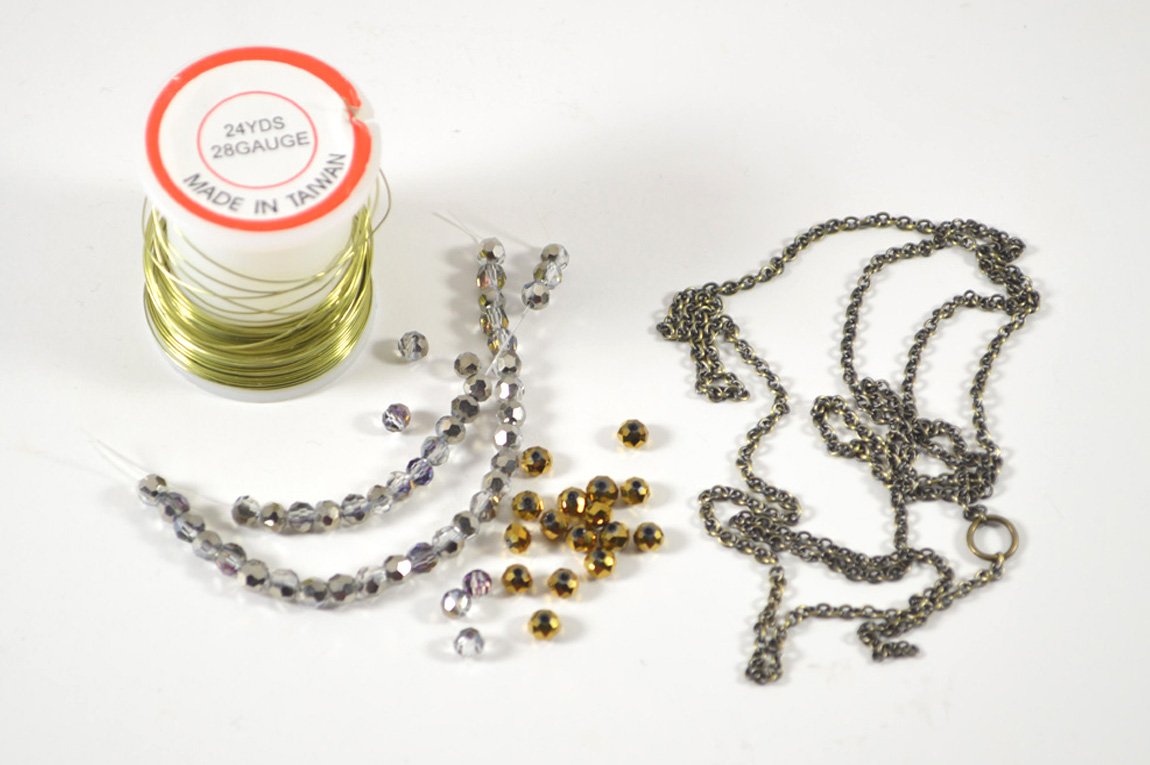

Supplies:– 28 gauge wire
– Small beads*
(I used faceted gold and silver beads purchased from Jo-Ann’s Etc & Michaels, respectively)
– Strand of chain
(Length is up to you, I made mine fairly long)
– 4mm jump rings
– 3-in-1 jewelry pliers
– Clear nail polish
(Not shown and optional, but recommended)
– Small beads*
(I used faceted gold and silver beads purchased from Jo-Ann’s Etc & Michaels, respectively)
– Strand of chain
(Length is up to you, I made mine fairly long)
– 4mm jump rings
– 3-in-1 jewelry pliers
– Clear nail polish
(Not shown and optional, but recommended)
* Number of beads will depend on the number of daisies you’d like to make. Each daisy calls for 6 “petal” beads and 1 “center” bead – in my case, 6 silver and 1 gold. I made as many daisies as I could with the beads I had on hand.

1) Cut a strand of wire measuring about 4-5 inches. This will be more than enough to work with, but I prefer to cut a bigger amount than needed. The length of wire for each flower will also depend on the size of beads you are using.
String on 2 beads, and position in the center of the wire. Take the other end of the wire and take it around and in through the 2 beads (second photo).

2) Pull both ends of the wire, so that the beads look a little something like the first photo. Next, string on 3 beads – petal bead, center bead, petal bead – onto the wire.

3) Take the opposite wire strand and string it through the 3 beads. For example, in the first photo above: I took the wire on the right side and strung it through the 3 beads – STARTING with the LAST silver bead I had just added. The tip of the right side wire is now on the left.
Tighten by pulling both ends of the wire. You can see the daisy start to emerge.

4) String on the last 2 petal beads.
Take the opposite wire, and insert it through the 2 beads. Pull both ends to tighten.
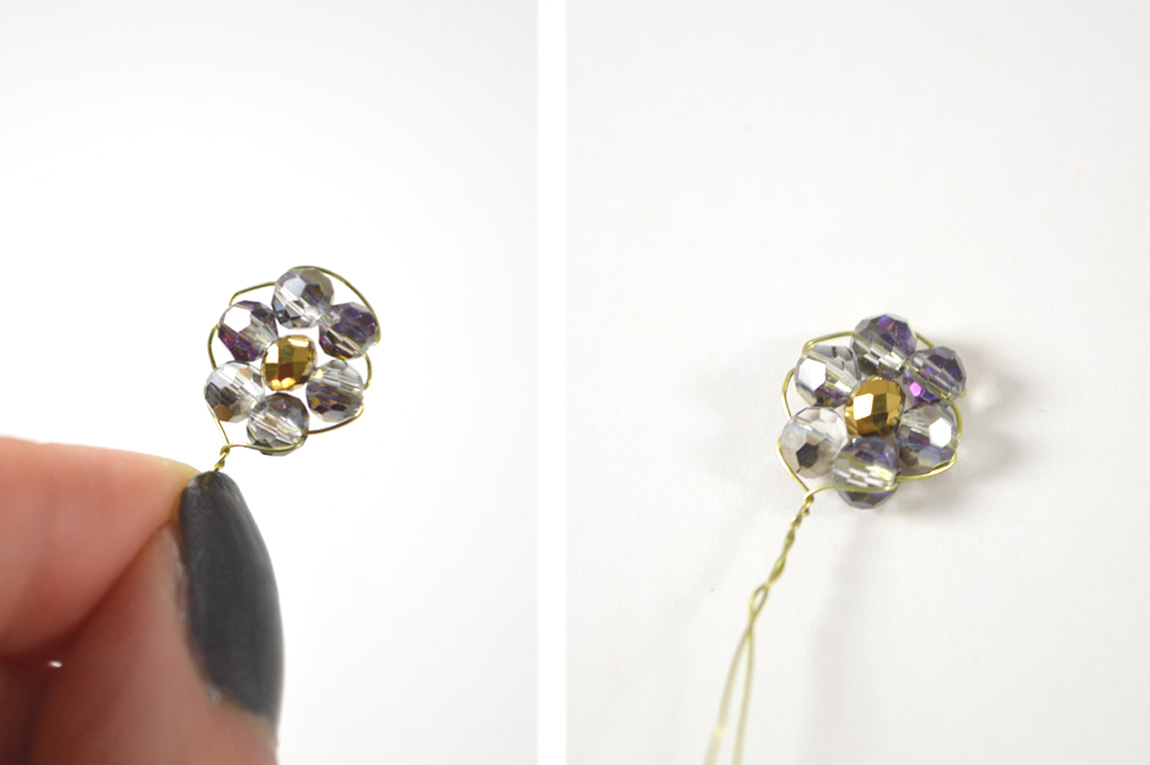
5) At the bottom of the daisy, twist the wire to keep the beads in place.

6) Trim the excess wire and fold up to secure. This is where the clear nail polish will come in handy – a dot at the tip can keep the wire from unwraveling, while a light layer on the twisted wire with polish can prevent untwisting.

7) Repeat until you have a handful of daisies 🙂

8) Connect each daisy with jump rings. (This may be a little tricky to do, depending on the type of beads you have and the gaps created with the wire. The 4mm jump rings are useful for getting in there!)
Side note: I decided to use silver jump rings at the last minute, even though I photographed gold jump rings as part of the supplies. The finish is up to you – don’t be afraid to mix and match metals!

9) Connect the strand of daisies to metal chain of your choice.

Now you have a chain of daisies to last the entire summer. Shorter versions would be cute, as well – just use less metal chain and a jewelry clasp. Alternatively, if you prefer something on the simpler side, you can make just one daisy and use it as a charm.
I love projects like these because you can use up leftover beads in an interesting way. You can even use the beaded daisies as embellishments for greeting cards, scrap booking, altered art, etc.
Hope you liked the first beaded project of the week! There’s another (slightly more detailed) one coming in a few days. Until then, enjoy!