
Embellished frames are absolutely everywhere this summer. A staple festival piece, for sure. That trend has the actual frames covered, but what about the rest of the accessory – in other words, the arms? To me, the arms of a pair of shades are almost like blank canvases…so much can be done!

To go along with this week’s inspiration of beads, I gave a little life to some plain jane sunglasses using seed beads that I had on hand. Just like the Daisy Chain Necklace, this is really not difficult to make. At all. Pinky promise. Once you get the hang of just one row of beads, the rest is just repetition.
Plus, I thought of this project a couple weeks ago and couldn’t wait any longer to make them. With that said, keep reading to check out the tutorial!


Supplies:
– Sunglasses
(Except aviators, which usually don’t have much of an arm to work with!)
– 28 gauge wire
– Seed beads in 2-3 different colors.
I’d recommend using the same brand & size, so that all of the beads are uniform in size & therefore easier to work with)
– Clear nail polish, optional
– Scissors, strong craft glue, 3-in-1 jewelry pliers
– Scissors, strong craft glue, 3-in-1 jewelry pliers

1) The most important part is to figure out how many beads will fit in the widest part of the sunglasses’ arm. From that point, you’ll know how many to weave in each line, and then slowly subtract 1 bead as the arm gets thinner and thinner. For my sunglasses, 6 seed beads were enough to fit the widest area. This may differ for you, depending on the sunglasses and specific seed beads.
In the end, the finished arm of beads is actually split up into 3 different pieces – the first portion has 6 beads in each row, the second has 5, and the third has 4. This makes it much more manageable!
Cut a strand of wire, measuring about 12 inches. This should be more than enough to make your first section.

Before weaving the beads, I created a pattern on graph paper. Essentially, each square represents a bead. You are more than welcome to follow this pattern! All it is are thicker stripes (gold and green) with a thin stripe of blue. I got a little fancy with that blue diamond shape at the end, but that’s not necessary of course. I threw that in to show how such a shape can be made, if you wish to do so.
If this all seems too complicated for you, here’s a way to make it super easy and simple: just create thick stripes, either in rows of 2, 3 or 4. Take your pick! Alternate between colors. Make it even simpler by just using seed beads in two colors. Do whatever you are comfortable with.
2) Continuing off the first picture: thread the first row of seed beads onto the wire.

3) Take the end of one wire side and insert it back through the row of seed beads. It’s more or less how the first row was created in the Daisy Chain Necklace – refer to Step 1 here, if needed!
Once both ends are pulled, you’ll have something like the first photo. String on the next row of beads on one side (second photo) and take the opposite wire and insert it through the beads, starting with the last bead you strung on.

4) Keep on going, following the pattern I shared or your own…whether it be just simple stripes or something else.
I continued this pattern – one set of what I drew – then twisted the wire and cut the excess. I folded this back to keep it in place. At this point, you can add a dab of clear nail polish for added security.

The first full section, all finished!

Perfect width for the sunglasses’ arm.

I repeated the pattern once more with 5 beads (middle) and then with 4 beads (right). As I created each portion, I held it up to the sunglasses’ arm to gauge when I should stop the 5 count rows and start with the 4 count rows.
In terms of wire: I mentioned earlier than 12 inches should be more than enough for the first portion. I used as much as 20 inches for the two parts above since I wasn’t sure how long each needed to be. As I always say…starting with too much never hurt, you can always cut away but you can’t bring some back!

5) Add glue to the sunglasses’ arm.

6) Press each beaded portion onto the arm. Because each part is made of wire, make sure that each one is straight and not bent. Here, you can see how the two different parts (6 count then 5 count) gradually get smaller with the arm.

7) Once all the parts are glued on, lay the sunglasses flat as above. Let dry completely. During this time, I worked on the same exact sequence for the opposite arm. It’s a lot quicker the second time around!

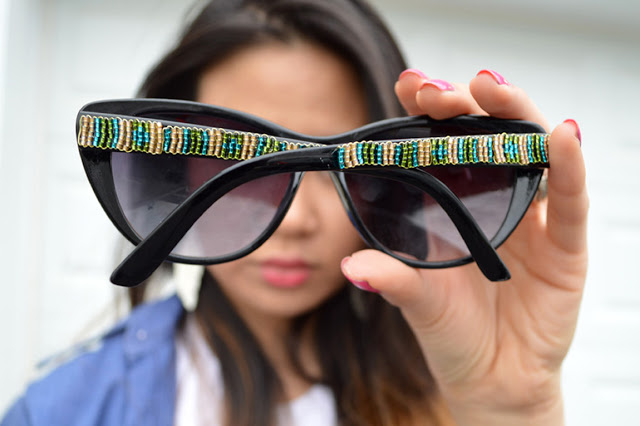
Once they’re dry, you’re ready to rock your embellished sunglasses.

If you have long hair like I do, the beaded arms will playfully peak out. And if you have short hair, then you’ll be making quite the statement with a pair like these.

Between the shape of the frames and the beaded detail, I’m kind of in love with mine. I feel like I always say this, but I might have to make a black and white version of these (as in, black and white thick stripes). Might be cool with a pair of tortoise frames.
xx K