
This is a quick and easy bracelet that can be made within a few minutes. It uses miniature metal hinges which are pretty much tiny versions of the hinges you see on doors. I had two on hand from a past freelance project, but never ended up needing them. A while ago I saw a few bracelets on either Anthropologie or Free People (can’t remember!) that had engraved metal ID plates. For some reason, it reminded me of these hinges.

It’s also a great project to use up those pesky fabric scraps, which I personally have endless amounts of. Those metal “studs” keeping the hinge in place are actually tiny scrap booking brads. Keep reading to see how I made the bracelet! —


Supplies:
– Scrap of fabric (mine is from a thrifted shirt)
– Fabric scissors
– Needle and thread
– 2 small scrap booking brads
– 1 small metal hinge
– Masking tape or scotch tape would be useful!
– 2 small scrap booking brads
– 1 small metal hinge
– Masking tape or scotch tape would be useful!

If you’re wondering, I purchased my hinges at Michael’s in the wood section. This is what the packaging looked like; it says 10 pieces because there were 8 screws along with the 2 hinges. I’m sure you can find similar hinges at hardware stores and other craft stores, as well.

1) Cut three thin strips of fabric measuring the length of your wrist plus an extra inch (2.54 cm) or two.

2) Braid the strips together. Let the fabric naturally roll up, or give it a few gentle pulls to facilitate rolling up. I found that taping the three strands at the edge of a table made it a lot easier and quicker to do. At the end, tie a knot (I gathered two strands together in one hand, and on in the other, and tied a knot that way)


3) Trim the ends to even them out, and stitch the fabric together a few times.

4) Without cutting the thread, lay the fabric ends that you just stitched on top of the other end of the bracelet. Stitch both ends together; I wrapped the thread around the fabric a few times, as you can see in the second photo. Don’t forget to try it on to make sure you can slide it on and off, before sewing the bracelet together.

5) Fold the hinge over the middle of the bracelet.

6) Insert one scrapbook brad into each of the hinge’s holes, piercing through the fabric. This will keep the hinge in place.

7) Bend apart the prongs on each of the brads to keep in place.

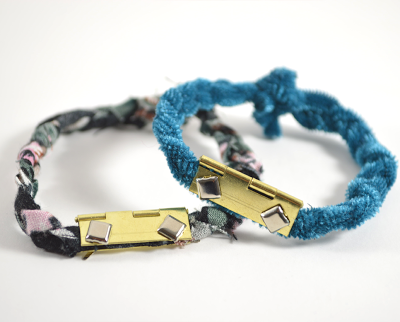
Cute and easy bracelet!


You can also try it with stretchy fabric, which doesn’t need stitching at the ends. Above, I made a second bracelet using vintage stretch velvet.