
I love kids’ crafts turned chic.
The story behind this one is pretty simple: when I was in elementary school, I used to go to extracurricular weekend classes held by a nearby district. I took one or two sports “courses” throughout the years I attended, but I remember the art classes the most. To me, it was like a weekly treat of making fun things.
I clearly remember one project – vinyl tube bracelets with glitter and water. I loved the concept of it.

About a month ago, I was browsing the plumbing section at the hardware store. I happened to glance down and see rolls of vinyl tubing – and I totally had an “OMG” moment. I knew I had to recreate that childhood project. It’s great timing, too, because they’re so easy and REALLY inexpensive to make – perfect for the holidays, gifts, crafts with family and kids.

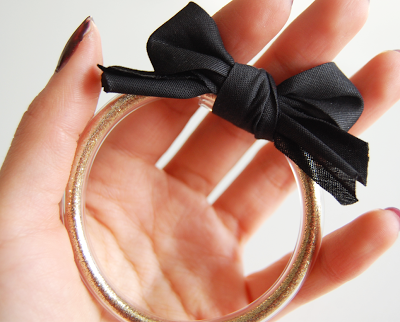
Of course, I had to take a stab at making a grown up version of that bracelet. I planned it so that it matched by favorite Kate Spade bracelet (black and gold – my favorite classic combo!)
If glitter isn’t your thing, you can substitute beads or rhinestones instead. I made quite a few variations…I couldn’t resist! See I made them, below.


Supplies:– 1/4″ clear PVC vinyl tubing
(I spent about $3 for 20 feet. Available at Home Depot here.)
(I spent about $3 for 20 feet. Available at Home Depot here.)
– 3/8″ PVC clear vinyl tubing
(I spent about $5 for 20 feet. Available at Home Depot here.)
– Painter’s tape (I used Frog Tape) or duct tape. Something strong and sturdy!
– Anything fun and sparkly
Glitter (fine, chunky, shaped, a mix of everything?), beads, rhinestones, etc.
– Small funnel for glitter
(I used a metal funnel that came with a perfume refill, and had another plastic funnel from a Sephora travel set of plastic bottles and what not. I’m sure you can find some on Etsy/Ebay, or even make a small cone with some paper and tape.)You’ll also need:
(I used a metal funnel that came with a perfume refill, and had another plastic funnel from a Sephora travel set of plastic bottles and what not. I’m sure you can find some on Etsy/Ebay, or even make a small cone with some paper and tape.)You’ll also need:
Scissors!
Optional:
If you’d liket to cover up the “connecting” tube…ribbon, or even a strip of fabric. I actually used bias tape leftover from a sewing project.

1) Cut a length of 1/4″ vinyl tubing, a little lesst than the length of your wrist measurement.

2) Cut a small piece of 3/8″ tubing, around .5 inch (1.27 cm) just to have on hand when you’re ready to close up the bracelet. This will connect the ends. Having to cut this while making sure the glitter doesn’t spill wouldn’t be too easy!
Take the long 1/4″ strand of tubing, and seal off one end VERY well with tape. Add layers if you have to. The curved nature of the tubing will help the glitter from spewing out of the other end, but it’s better to safe than sorry.
Insert the funnel at the other end of the tube, and hold in place.

3) Carefully pour in the glitter, as little or as much as you’d like. I poured enough so that the glitter was packed in, and didn’t move too freely.

To encourage the glitter to move on down the tube, tap – don’t shake! – the funnel.


4) When you’re done, take the small 3/8″ tubing piece and insert the bracelet portion into it. Don’t force it too much – do this slowly – in order to keep the glitter from spilling everywhere.
Carefully remove the tape from the other end. It might help to hold your thumb over that short connector while you do this.Complete the bracelet by connecting the first end into the 3/8″ piece.

Optional: Tie it off with a bow!


I experimented with different colors of glitter, some of which varied in type (fine vs. extra fine. I used fine glitter in this tutorial!). I even tried out some tiny rhinestones and small confetti-looking beads – which I’ve had for literally years.
They’re kind of addicting to make. And SO inexpensive! The tubing is great for making bracelets in general, even without the glitter or rhinestones. It would serve as a good, sturdy plain clear bracelet that can be wrapped in fabric or ribbon.
Enjoy!